Showing posts with label good info. Show all posts
Showing posts with label good info. Show all posts
Tuesday, 24 July 2018
Cara Install Aplikasi Windows 10 Secara Offline 2018
Sejauh yang kita tahu hingga saat ini, aplikasi Windows 10 hanya dapat kamu download secara eksklusif melalui Microsoft Store. Microsoft sendiri tidak menyediakan opsi untuk download package aplikasi lalu menginstalnya secara offline, semua proses download dan installasi juga berjalan secara otomatis, hal ini berbeda dengan beberapa tahun yang lalu dimana Microsoft menyediakan opsi tersebut pada era Windows Phone 8.

Tetapi kamu masih dapat mendownload aplikasi Windows 10 secara offline dengan bantuan pihak ke-3 berupa sebuah halaman website yang bernama store.rg-adguard.net.
Install Aplikasi Windows 10 Secara Offline
Cara kerjanya cukup mudah, kamu hanya perlu memasukan link dari aplikasi Microsoft yang diinginkan lalu memasukannya pada kolom yang tersedia serta memilih channel yang kamu gunakan saat ini (Fast Ring, Slow Ring, Release Preview atau Retail).
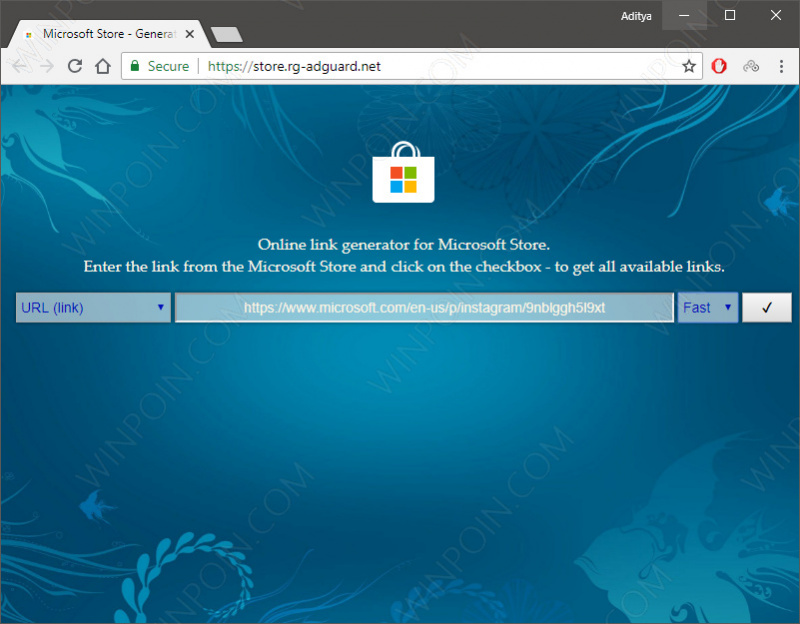
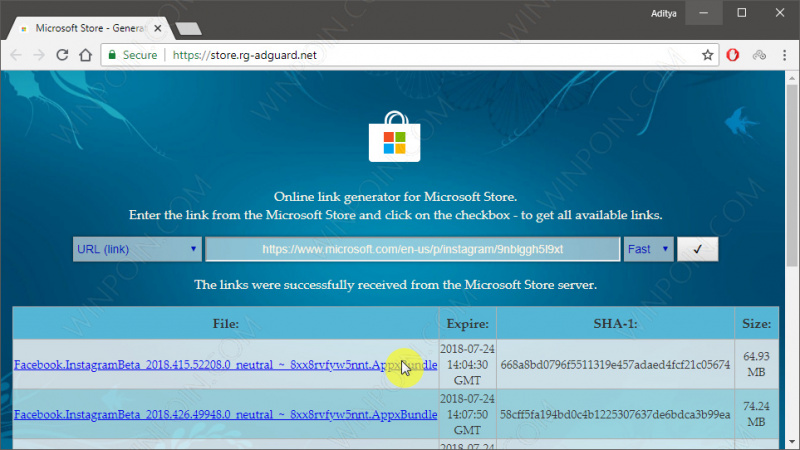
Setelah itu, daftar link aplikasi akan tersedia berserta versi dan checksum, pastikan kamu memilih paket yang tepat sesuai dengan aplikasi yang ingin kamu download. Tunggu proses download hingga selesai (cepat atau lambatnya proses download tergantung dari kecepatan internet yang digunakan).
Proses selanjutnya adalah tahap installasi. Untuk itu, kamu harus mengizinkan Side Load apps di Windows 10 agar dapat menginstalnya secara offline. Jika sudah maka kamu hanya perlu menjalankan file .Appx / .Eappx dengan cara klik 2x, lalu klik muncul Install ketika muncul pemberitahuan.
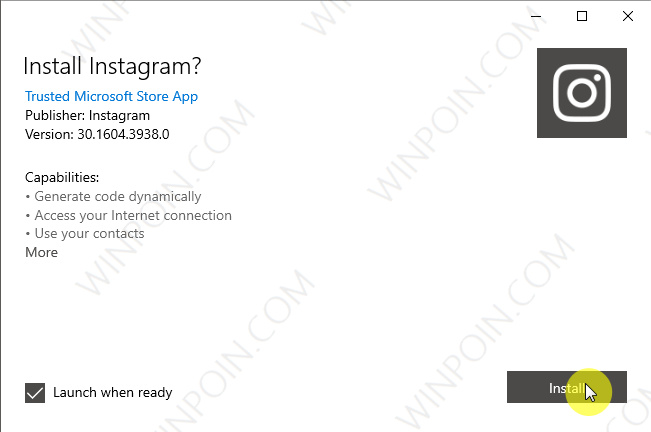
Tunggu prosesnya beberapa saat hingga nantinya aplikasi siap dijalankan.
That’s it!
Source : https://winpoin.com
Monday, 23 July 2018
Cara Menambahkan Safe Mode pada Boot Options di Windows 10
Ketika Windows 10 kamu mengalami masalah, misalnya saja karena virus, konflik antar software, atau salah ketika melakukan konfigurasi, maka masuk ke Safe Mode bisa menjadi salah satu langkah untuk menyelesaikan masalah.
Dengan masuk ke Safe Mode, maka kamu dapat coba untuk melakukan troubleshooting terhadap masalah yang kamu hadapi. Karena Safe Mode hanya akan menjalankan Windows dengan komponen yang diperlukan saja, tanpa perlu menjalankan aplikasi pihak ke-3.

Ada beberapa cara agar dapat masuk ke Safe Mode, salah satunya adalah dengan menahan tombol SHIFT ketika memilih opsi Restart. Tetapi jika ingin masuk Safe Mode lebih cepat lagi, maka trik dibawah ini dapat membuat kamu menambahkan opsi Safe Mode pada boot menu.
Menambahkan Safe Mode pada Boot Options di Windows 10
- Buka Command Prompt as Administrator.
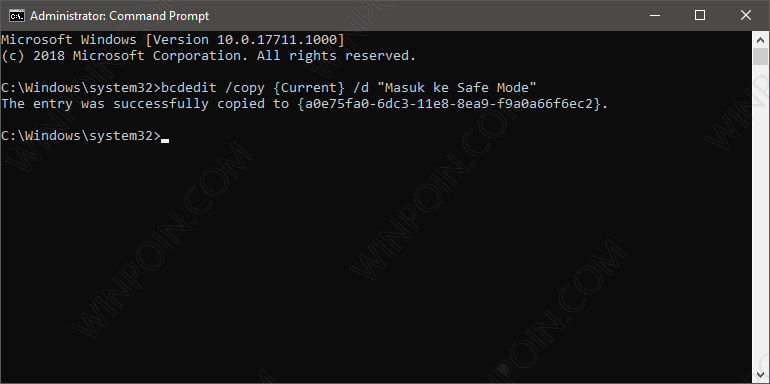
- Ketika jendela Command Prompt telah terbuka, kamu dapat memasukan perintah dibawah ini. Kamu dapat mengganti tulisan warna merah dengan kata yang diinginkan.
bcdedit /copy {Current} /d "Masuk ke Safe Mode"
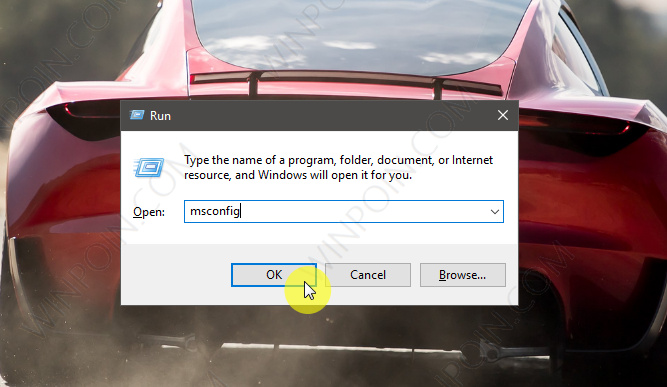
Buka Windows Run (Win + R), lalu ketikan msconfig untuk membuka System Configuration.
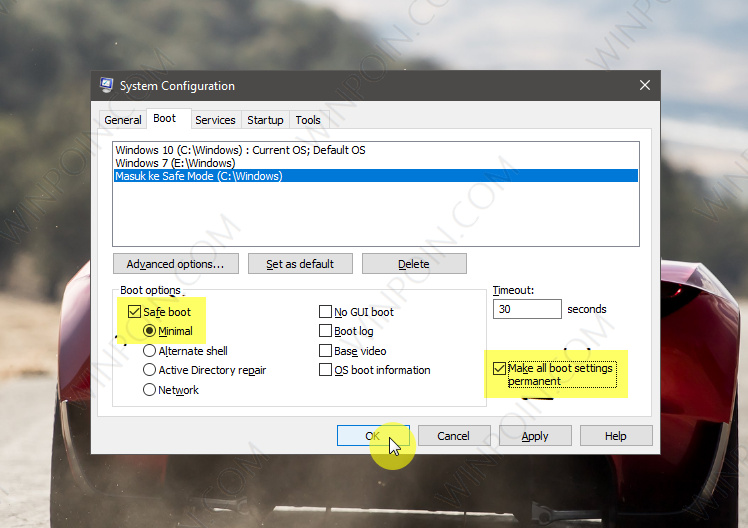
Kemudian navigasi ke tab Boot, lalu kamu akan menemukan opsi Boot yang barusan dibuat. Beri tanda centang pada Safe boot lalu pilih Minimal, dan terakhir beri tanda centang pada opsi Make all boot settings permanent agar opsi Safe Mode tidak akan hilang. Jika sudah klik OK untuk menyimpan perubahan.
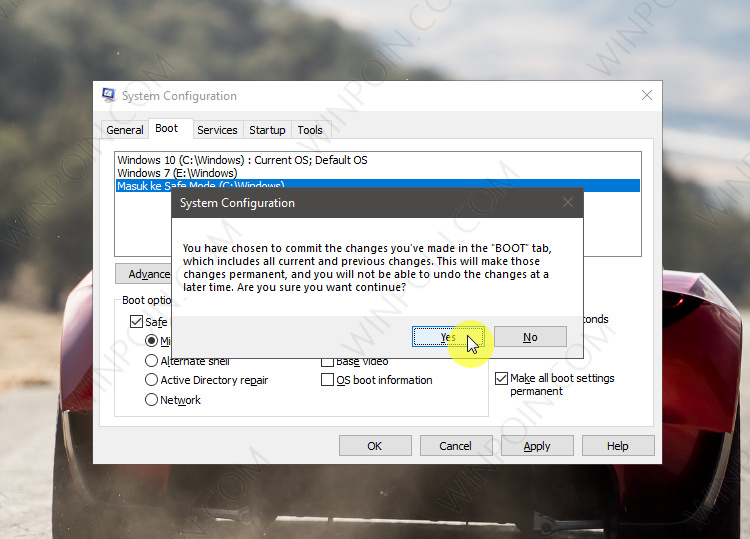
Ketika muncul peringatan, klik saja Yes
Terakhir kamu diharuskan untuk melakukan restart agar dapat melihat perubahannya. Kamu dapat langsung melakukan restart ataupun nanti dengan memilih opsi Exit without restart.
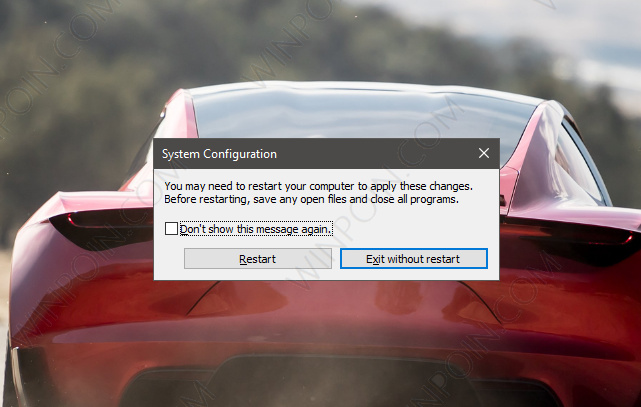
- Done.
Dengan begitu maka kedepannya akan muncul opsi masuk ke Safe Mode pada saat masuk ke Boot Options. Trik ini juga dapat kamu aplikasikan pada Windows 7 ataupun Windows 8.x
Sources : https://winpoin.com
Wednesday, 23 May 2018
Tutorial: How to Install Adobe XD CC Free to Mac and MacBook
Tutorial: How to Install Adobe XD CC Free to Mac and MacBook. Some time ago Adobe officially released Adobe XD CC for free. Yes, that means you no longer need to subscribe to an expensive monthly fee if the goal is just to use Adobe XD CC this. This license is real free, not trial and does not contain any in-app purchase

Read More
Of course there are some differences with paid versions that subscribe. Some of them are the number of Active Shot prototypes document and the shared shared design design specs are limited to one, and the cloud storage is just 2GB. For more information you can read the following article. Read : Adobe XD CC Official Now Available in Free Version .
For steps on how to install Adobe XD for free, you can follow the following tutorial:

- Simply click Get XD for free to make free download Adobe XD CC.
- The automatic downloading process will start and the downloaded file will be tailored to the Windows or Mac platform, according to the computer or laptop you are using.
- Simply double click the installer file.
- The download and install process will take place, wait for it to finish.

- In addition to installing Adobe XD CC, the installation process will also install Adobe Creative Cloud Desktop and others.
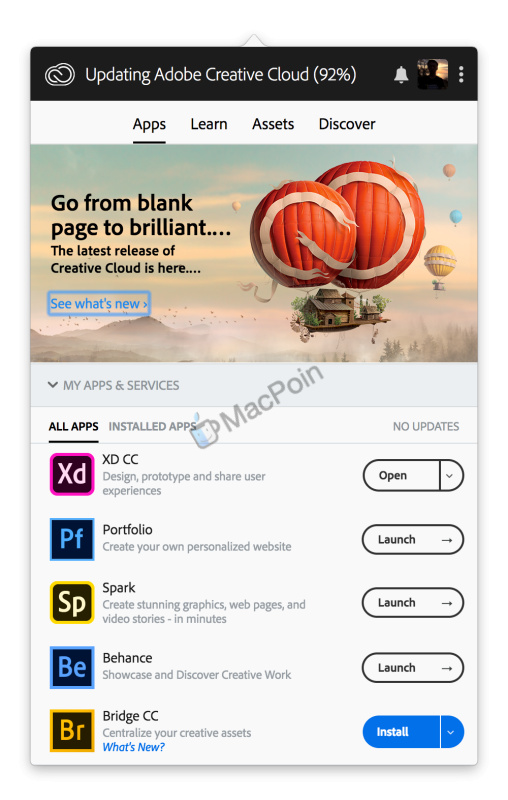
- Once done, you can directly use Adobe XD CC for free.
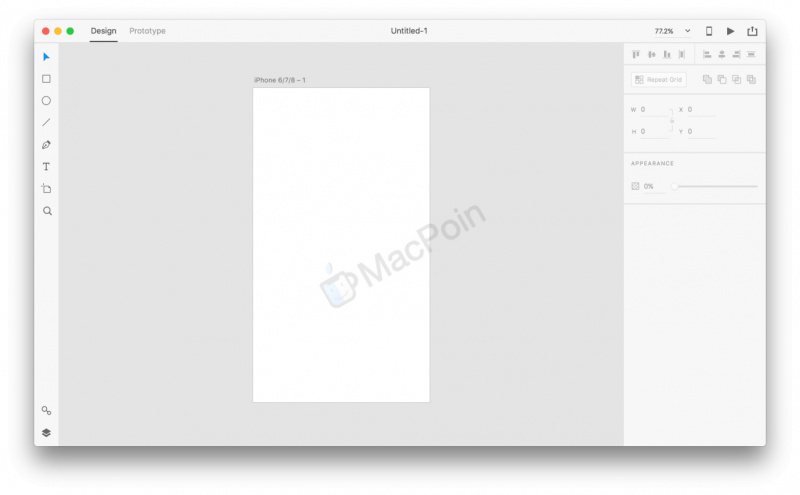
As far as I'm trying, Adobe XD CC software is really free in the sense that there are not many feature restrictions in it. In the description of the official website , Starter Plan subscription package is free and has some actual restrictions are not too much if the goal just to learn Adobe XD.
For a full review I will probably discuss in a separate article. While waiting, download and install Adobe XD first for free here.
How? You find a big difference between Adobe XD CC free with the paid version?
Apple Soon to Overcome APFS Problems on Mac Fusion Drive
Apple Soon to Overcome APFS Problems on Mac Fusion Drive. High Sierra macOS update brings a whole new range of features to Mac and MacBook computers. Among all the new features, there is one feature that all Mac computer users can not enjoy.

Read More

The feature is Apple File System aka APFS. APFS is a new file system that replaces HFS + on the previous macOS. Only, this feature so far only can be used on Macs and MacBooks that use SSD only. While the Mac is still using Harddisk and Fusion Drive can not.
Fusion Drive is a storage consisting of "combined" hard disks and SSDs into one drive. So you will only see one drive only, and all files will be automatically determined whether it will be stored on an SSD or hard drive.
Fusion Drive users until now still can not feel the APFS feature. But reportedly from MacRumors, Craig Federighi provides news that Mac users with Fusion Drive will soon be coming APFS feature.
One of MacRumors reader, Jonathan sent an email to Craig Federighi. He asked if Apple intends to release the APFS feature to Fusion Drive or not. Then Craig replied to the email and stated that Apple will soon solve this APFS problem as soon as possible.
Just information, Fusion Drive had missed this APFS feature when the macros High Sierra Beta released. Somehow this feature is drawn in the mac mac High Sierra final released to the public and until now has not been released again. Reportedly there was a little problem with Fusion Drive when using APFS.
How to Activate Full Version DaisyDisk License on Mac and MacBook
How to Activate Full Version DaisyDisk License on Mac and MacBook. For those of you who have previously used DaisyDisk, definitely feel the choice of limited features.One excellent feature that can not be used in the free version of DaisyDisk is scanning or macros scan with administrator mode. This feature can only be activated with full version DaisyDisk license.

Read More
Of course for you who want to use the various features, you must enable the full version license from DaisyDisk. After the license is active, you will be able to use all the features available in the application.
To activate the full version license from DaisyDisk, you can follow the following tutorial:
- Log in to the DaisyDisk web page . You can also try to enter DaisyDisk license discount page here if the promo period has not been exhausted.

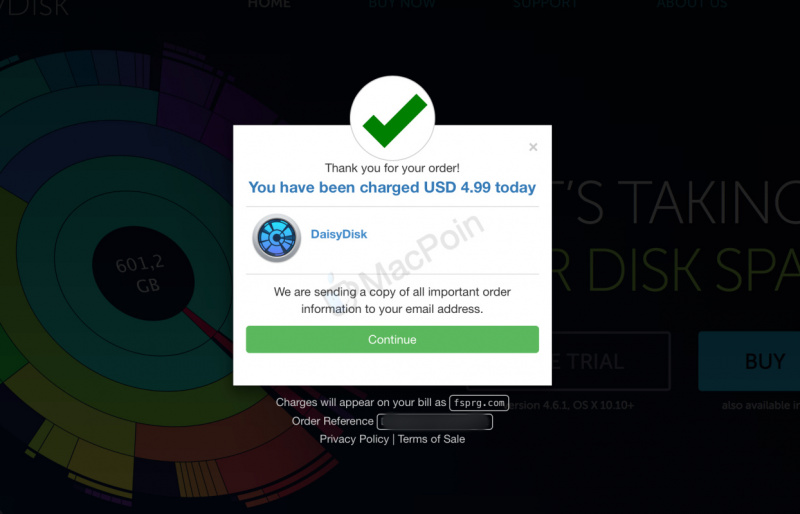
- You will meet with the purchase look like below.
- You can pay DaisyDisk license with PayPal, credit card, debit, and so forth.
- After you enter payment data, you just process to finish payment DaisyDisk license.
- If successful, you will get the Name and Registration Key via email. Name and Registration Key must be used to activate the license.
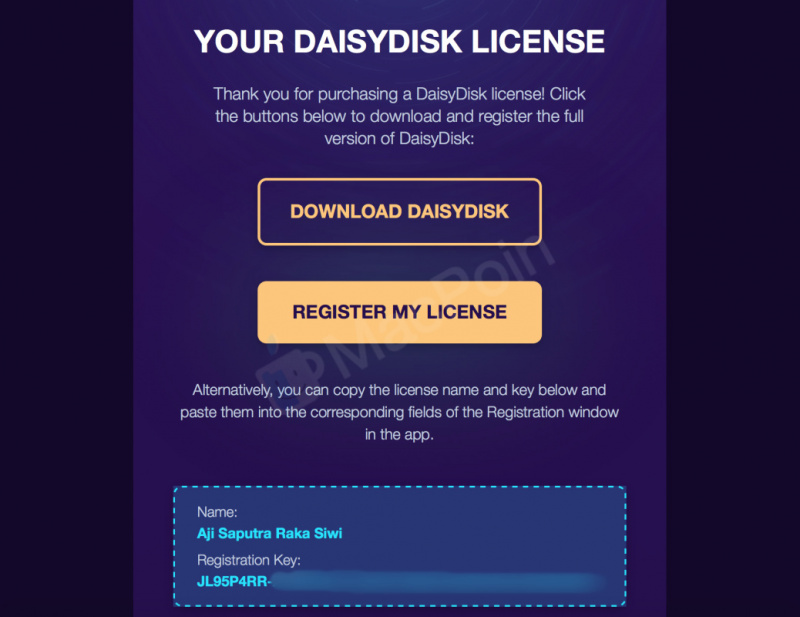
- Immediately enter the information into the Registration option on DaisyDisk application.

- Now the license is active and you can use all the features of DaisyDisk in full.
How? Already managed to activate the full version license from DaisyDisk this?
Share your experience in the comment field yes, and also do not forget to follow the Twitter account MacPoin 
Rumor: TSMC Already Begin Mass Production of 7nm Processor for Latest iPhone
Rumor: TSMC Already Begin Mass Production of 7nm Processor for Latest iPhone. Apple is designing their own processors for their use on various iOS devices. Call it the iPhone, iPad, and also the iPod Touch. These products use different processors from all competitors.

Read More

Apple is also famous for giving a lot of innovation for its homemade processor. One example is the A7 processor which is the first 64-bit processor for smartphones up to A11 Bionic.
To realize Apple's ambitions, they need third-party suppliers. One supplier that is TSMC, as quoted by Apple Insider, reportedly have started production of processors for the latest generation iPhone.
The latest processors, which traditionally will likely be named A12 will be the first A series processor with a 7nm process. As information, the A11 Bionic processor released to the iPhone last year was produced with a 10nm process.
Depreciation of these measures can produce several benefits. One is the increased density of transistors that ultimately increases the power usage more efficiently.
Even so, it is still unclear as to whether the new features will be presented in the latest processor for this iPhone. Apple processor for this iOS device is rarely get leaked new features. New features will usually be revealed in the latest iPhone launch keynote.
What do you think about the processor for this latest iOS device?
Do not forget! Apple WWDC 2018 Will Start on June 4, 2018
Do not forget! Apple WWDC 2018 Will Start on June 4, 2018 .Apple is ready to host the 2018 WWDC event on June 4, 2018. This event is an annual event where developers gather and Apple will announce a variety of feature updates and technology, which can then be used by various developers to develop their flagship software.

Read More

Although true intended for developers, you as Consumer level users can also enjoy it. Just like in previous years, Apple is expected to release the latest updates from various platforms and flagship devices, such as iOS, macOS, tvOS, watchOS, and so forth.
Apple reportedly also has been distributing invitations to some media and journalists to attend the event's 2018 WWDC event on June 4, 2018, at the McEnery Convention Center, San Jose.
For those of you who do not get the invitation, just take it easy. Because Apple will also provide live streaming WWDC 2018 for free that can be accessed by everyone from around the world.
Some of the most anticipated announcements are iOS 12 and macOS 10.14. iOS 12 reportedly will not bring many new features as it focuses on bug fixes and system performance improvements only.
Likewise with macos 10.14 is reportedly also more focused to fix bugs and upgrade updates.Various new features will reportedly be released next year.
How? Already impatient with various exciting announcements at the 2018 WWDC event?
Subscribe to:
Posts (Atom)
BEST OF THE BEST
-
 Description Download CorelDRAW Graphics.Suite.X7.17.1.0.572.x32 FULL CRACK | New | 16dotcom | Free - The latest version of Rillis, afte...
 -
 Description Her Premiere + After Effect's been predictably, Adobe Premiere Pro's main functions are the Premiere for stringing ...
 -
 Description Download Ahlijasa-Home-Service-Online_v1.3.1 for Android | New | 16dotcom | Free - Ahlijasa | Home-Online Service Helps yo...
 -
 IDM memang menjadi software idola dalam hal download mendownload. Tetapi akhir-akhir ini muncul suatu kasus yang agak aneh menurut saya. B...
 -
 Zemana AntiMalware Premium 2.72.2.324 Final Full Patch adalah salah satu program perlindungan PC anda yang akan melindungi komputer anda d...